
Impressions of a vault door installation
Wolfgang FriedrichDear interested parties,
We will accompany your vault door project from A to Z, from the very first idea to the locking of the vault door.
We receive many photos of locations during the planning phase and sometimes also photos of the vault door when it is ready for use.
Today, however, we are also receiving photos during the installation of a vault door, so we can show you some aspects of that as well. We expressly thank Mr. S. for providing the photos and for permission to publish them.
But let's start with the initial situation:

Here, several problems arise. Let's look at them in detail:
1: top: lintel flush with the ceiling.
2: right: wall beveled.
3: right and top: heating pipes.
4: bottom: raw screed floor.
5: left: chimney with bricked-up masonry in front of it.
Project planning:
1: The problem with a lintel flush with the ceiling is that the door frame is about 2cm higher when measured diagonally during installation. It helps that the floor is not yet finished, because this allows the floor to be opened and the frame to be placed there, which we solve using a standard floor profile 100x50mm. By lowering it into the screed, we can now make the frame a little larger, so that after inserting and pushing up the frame, this floor threshold is still somewhat recessed in the floor, which reduces the step-over height of 50mm, making it simply more comfortable to step over. At the same time, this allows us to achieve the largest possible door opening dimension (height).
2: The slanted wall is not a problem for us. Our customer chooses a larger width here so that the fasteners can later engage cleanly into the wall and be fixed there.
3: The heating pipes will also be relocated, and the door's inward swing will be taken into account.
4: The raw screed will be professionally reworked after opening (point 1) and can then be covered.
5: A chimney always presents a special challenge, as it must not be drilled into to insert fastening elements. Here, the additional pre-built wall came in handy.
Installation of the vault door:
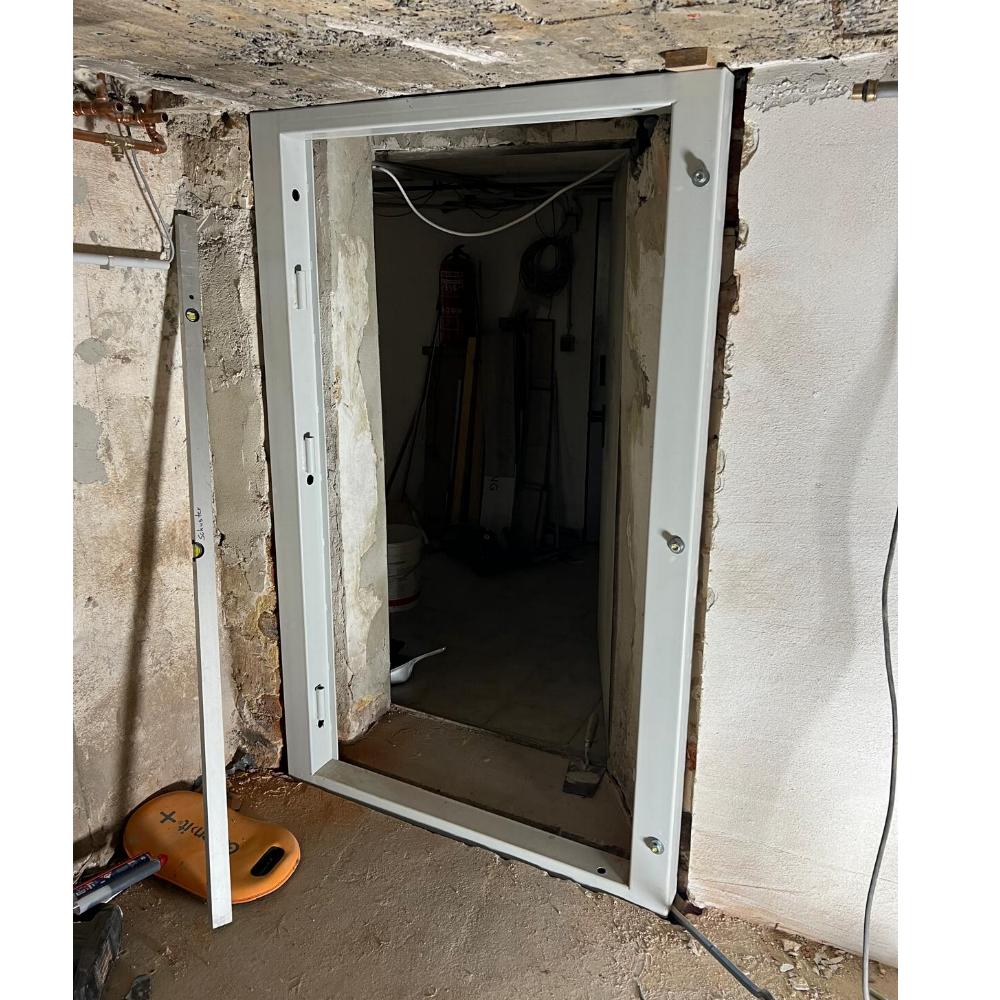
The custom-made vault door has now arrived, the slanted wall has been adjusted, the pipes separated, and the screed floor partially removed. Clearly visible:

The special profile 100x60 was chosen as the upper frame profile. The customer permanently gains the 40mm saved in the clear door height.
The frame was recessed into the floor, so that only a small step remains, which will be further reduced once the flooring work is completed.
Also clearly visible and the answer to a frequently asked question: Can the door be removed for easier transport? Yes, as you can see, but this only works if the door opens inwards into the room. Here it is still removed.
Another special feature is the fastening of the frame. On the left, it is completely hidden within the frame; the anchoring elements extend to the LEFT out of the frame and anchor into the small bricked-up wall. The screw heads disappear into the frame profile. On the right, the anchoring elements extend BACKWARDS from the frame. Here, long threaded rods were used, which were anchored bomb-proof in the slanted existing wall with composite mortar.
The installed vault door:
Once everything is professionally plumb, level, and securely fastened, the vault door can be reinstalled:

Looks very good already, the door runs freely and:

of course, it also closes. Now the frame and connections can be cleanly plastered.
There was also a little extra on top, did you see it?
The FH door, previously used as a room door and installed on the corridor side, was retained and now offers excellent fire and visual protection on the corridor side.
Conclusion:
As you may have already discovered elsewhere, we always strive to project the best possible solution from the spatial situation in existing properties to enable our customers to achieve perfect, long-term use. We identify special features, discuss them with our customers, determine which technical options we can use, name the respective costs, and our customers then decide which path we will take.
This, and only this, is how you will find your perfectly custom-made vault door.
Trust our expertise, we look forward to your project.