
Gun safe in the test: The test criteria for the gun safe test
We will now describe the individual testing criteria that gun cabinets must meet.
A lot of technology, but for your better understanding we have illustrated the respective points as clearly as possible.
You see good and not so good solutions.
Decide for yourself what is important to you:
Packaging/transport protection:
To ensure that your gun safe arrives properly, it should be properly packaged.
A stable pallet, a reasonable cardboard box, foil-wrapped outer packaging and additional protection for protruding cabinet elements are crucial if transport damage is to be excluded as far as possible - which of course does not necessarily work in every case, as the photo proves.
![]()
Pictured: Transport damage despite additional bubble wrap:
Box is torn open
Foil is punctured
Paint damage to the safe
Non-standard double-bit locks:
Burg/Wächter Secu S 1000
Double-bit lock type: a special lock in SPECIAL DIMENSIONS AND SPECIAL CONNECTION from the BurgWächter subsidiary SECU is expensive to obtain as a replacement , as replacing it yourself is very difficult, for example if a key is lost:

Pictured: non-standardized double-bit lock in special size SECU S 1000 in BURG WÄCHTER
Standardized double-bit locks:
A lock from other German brand manufacturers in STANDARD DIMENSIONS usually shines because replacements are inexpensive to obtain and can be easily replaced without any major problems if, for example, a key is lost.

Pictured: StuV Steinbach & Vollmann lock in standard size, type Cablox
Key length:
crucial for comfortable carrying of keys, e.g. on a key ring.
The longer the key, the more cumbersome it is in everyday use.
Although: a combination lock makes many things easier.
These are usually available for the models, some models with electronic lock, others also with mechanical combination lock.

Pictured: keys of different lengths
Handle fittings:
Type and design of the door handle:
Metal door handles are more stable and durable than plastic ones, which can often break during use. This makes operation more difficult and leads to unnecessary costs for handle replacement.
 Pictured: Metal folding handle of the SHOOTER model.
Mounting options:
The more anchoring options you have in the floor and/or the back wall, the better it is for you, as it gives you more flexibility when anchoring .
Any anchoring material supplied is also advantageous, but its suitability should always be checked.
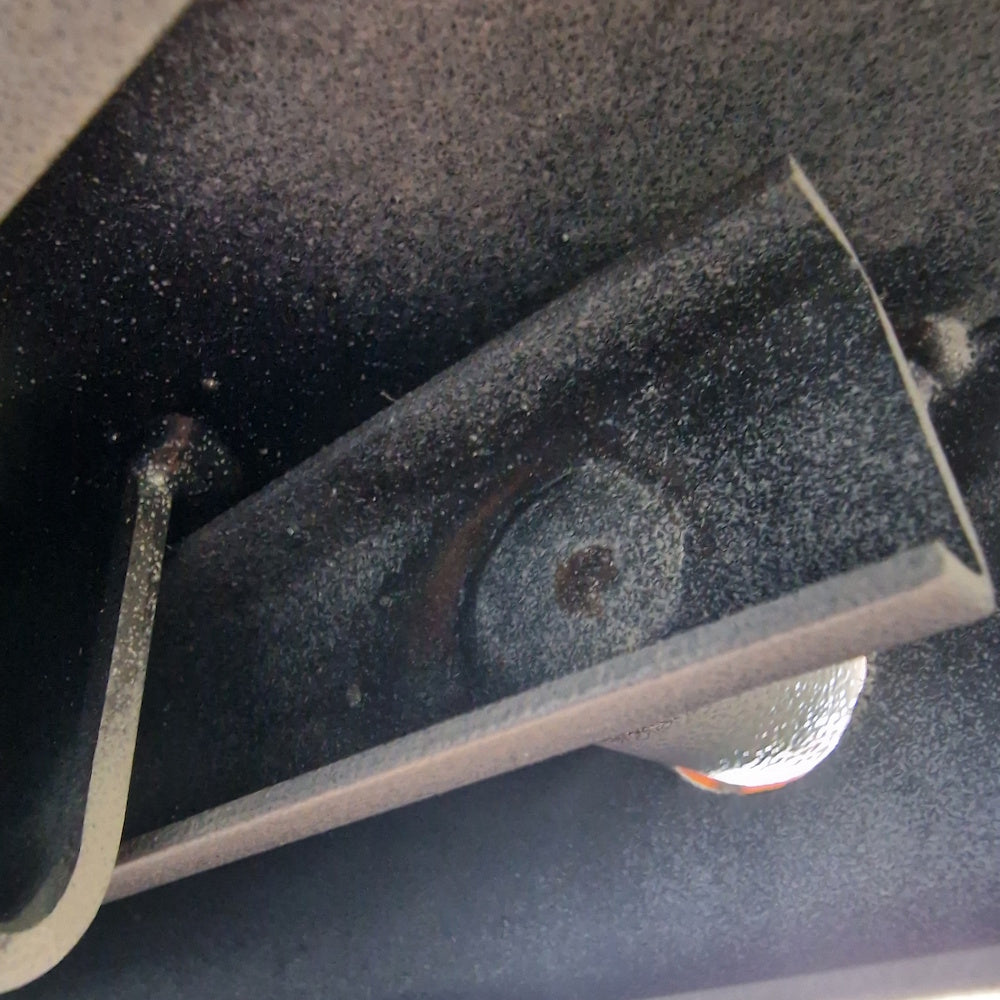
The decisive factor here is the material in which the anchor is used, and for each material there are anchoring devices that are suitable or unsuitable.  In the picture: double lower rear wall drilling and double floor drilling in the HUNTER gun cabinet.
Locking bolt connections:
Door security: in words and pictures, what you can do without:

Pictured: No joke, no fake! Rusty and non-securing bolt clip in a NEW SAFE! A customer service visit is inevitable.

Pictured: Bolt safety clip popped off, the bolt is now unsecured and is no longer operated by the locking rod: customer service case! ...

Pictured: ...and there it lies, the broken and bent bolt clip. Only there, it's useless.
Whether a gun safe is high-quality and durable, or whether poor manufacturing skills can lead to problems or even the inability to open the safe, lies behind the interior door paneling. This, in turn, determines whether you will sooner or later face unexpected, sometimes significant, costs for customer service, repairs, or a replacement due to a total failure.
We already looked at the problem in detail above: the locking bolts are attached to the locking rods with simple clips. If a bolt comes loose, the cabinet can no longer be opened, as this bolt is not pulled back into the door after locking and simply remains stuck outside, continuing to lock the door. It's hard to identify such a hidden weakness more clearly and document it with photos!
So things can be better. Here's what you shouldn't do without:

Pictured: bolt, screwed
Pictured: bolt, welded
Of course, properly securing a locking bolt requires more assembly effort, for example, by screwing it in (but then please secure the screw or nut with Loctite or a snap ring) or, even better, by welding it firmly. This takes time in production and makes the cabinet more expensive. But the extra cost is worth it!
Bolt guides - locking bar guides:
You'd think it wouldn't be difficult to fit a locking bar guide straight. But apparently it is:

Pictured: locking bar / Locking bar guide in the ISS Lucerne
To make it "better," the crooked guide pin is hammered during assembly, but this doesn't have a lasting impact:

Pictured: hammered guide pin for guiding the locking bar, ISS Lucerne
Bolt guides:
The bolt's passage through the door frame is an important factor in determining whether a bolt system runs smoothly or jams. If a bolt runs crookedly in the bolt guide, it usually jams, meaning the bolt system becomes stiff. As you can imagine, this has long-term consequences for users:

Pictured: Bolt guide in ISS model, see red arrows, no words. (Sorry, but such a botched job was only documented photo-graphically; the manufacturer is still responsible for production and quality control.)
When, for some inexplicable reason, the smooth operation doesn't work, some mechanics are tempted to express their anger with a hammer. However, one shouldn't unleash one's unbridled strength on a locking bolt, as this can sometimes cause a safety clip to pop out of the bolt groove, as we saw above:

In the picture: a bolt that has been hammered on. We won't say which manufacturer this "masterpiece of craftsmanship" comes from, you already guessed it.
Locking bar guides:
These are intended to prevent the locking bars from bending along their length, which would also contribute to stiffness. However, if the locking bars are already welded crookedly and unevenly to the locking center, and the guides are also "skewed" as seen above, we get the opposite effect: the crooked locking bar promotes stiffness.

In the picture: locking bar welded crookedly to the locking bar, the locking bar is "twisted".
The central element: the locking center:
Locking center with toothed gear:
A gearwheel operates in the control center, which finds its matching counterparts in the distribution plates of the locking mechanism and operates them smoothly. If well greased, such a locking center will last a lifetime.

Pictured: Bolt center with toothed gear (front view without boltwork cover plate) found in the Shooter and Hunter models.
Locking center with pressed-in locking pins:

In the picture: disassembled boltwork with pressed-in locking pins
Especially with pressed-in locking pins in self-made locking units, often exacerbated by other causes of stiffness in the locking bars, it can be observed that the pins become loose or eventually break out, making the locking bar in question impossible to move. This makes the cabinet impossible to open without brute force, resulting in total loss!

Pictured: locking center with pressed-in locking pins (view from above), ISS / identical to Format-Eisenbach.
Security for lock and hinges:
Hinges:
Removable hinges make transporting the door to the desired location easier for the customer. If similar materials rub against each other, they will wear each other down. A design separation is therefore necessary, as otherwise the door will sag over time due to mutual wear and eventually hit the casing, which then leads to serious locking problems. A height adjustment on the hinge can be used to adjust the door's sagging. However, this is only absolutely necessary if no other precautions are provided for abrasion protection.

Pictured: removable hinge from the discontinued GUNTRESS model, with brass ring as abrasion protection.
Hinge lock:
The hinge side must be secured against being pried off.
Background: During burglaries, the hinge pins are often cut off with angle grinders and attempts are made to pry the door open via the hinge side, so this side must be well prepared against such attacks.
This can be achieved by means of selective, movable or fixed locking bolts or a stable rear grip rail running through the entire surface, whereby a continuous securing system is preferable to a selective securing system.

Pictured: continuous rear grip rail of a PROMET safe
Puncture protection for the lock:
An important security element that prevents the safe from being opened if the lock is removed from its position.
The further away a protective element is from the locking center, the more effective it is, as it will not be removed if attacked with an angle grinder, for example.
An active system is preferable to a static system. Effective protection of the actual lock bolt in the locking center is usually a basic element; an active relocker is rare in lower security classes.
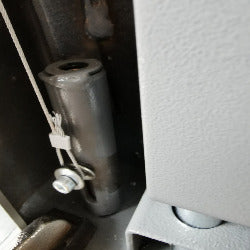
Pictured: active relocker from the discontinued GUNTRESS model
Why we buy a gun safe:
the gun owners:
Weapon holder material:
The weapons should be stable and the weapon holders must not damage the weapons themselves or be damaged by use.
With foam gun rests, individual pieces sometimes break off after a while, which can limit the use of the rest at that point. A factory-applied rubber coating can remedy this.
Weapon holder width and depth:
The dimensions of accessories such as scopes or night vision attachments determine the space required for each weapon.
Therefore, the width must be adjusted to ensure the distance from the barrel center of one weapon to the barrel center of the next weapon, so that the next storage space doesn't have to remain empty, which would reduce capacity. Only 60mm or more is suitable.
The height of the accessory assembly, including mounting rails, from the top edge of the barrel determines the required depth. 80mm or more is recommended.
Adequate shaft protection on the ground should be effective.
Let’s look at what solutions are available:
Wooden weapon holder, felted

Pictured: fixed weapon holder from the (discontinued) GUNTRESS made of wood, felted.
Foam block - weapon holder

Pictured: Foam block - weapon holder in format / Eisenbach Capriolo

In the picture: the rubberized foam block of the SHOOTER model achieves the necessary minimum dimensions in terms of weapon spacing and adjustment depth.
Three-dimensionally adjustable weapon holders:
The crème de la crème is, of course, a weapon rack that isn't subject to any restrictions in terms of width, height, or depth. This allows you to assign each weapon the individual space it requires based on its design and the accessories it mounts. This efficiency is also reflected in the fact that a cabinet of the same dimensions can suddenly accommodate more weapons than the same model with fixed weapon rack blocks, since no space is wasted by unnecessary open spaces. 
Pictured: GUN-i-FLEX weapon holder from the HUNTER model.
Storage options: shelf, door storage box, shelf section:
Height-adjustable shelf:
As standard, every gun safe should have at least one shelf.
This should be height-adjustable via a grid rail system and should also be completely removable if necessary.
Principle: the more shelves, the better, because you can never have enough storage space for handguns, ammunition, binoculars, accessories and documents.

Pictured: Shelves, height adjustable and removable, model SHOOTER
Storage boxes in the door:
Until the 2010s, safe manufacturers manufactured the interior door panel as a solid panel, even though there is a lot of unused space behind it.
More modern safe models utilize this unused space by using it as additional storage space.
The door storage boxes - a clever idea that offers you more storage space and therefore greater utility.

Pictured: door-integrated storage boxes in the SHOOTER and HUNTER models.
Shelf part:
On the one hand, a shelf increases the storage options, but it also reduces the remaining space for the long guns, so that their capacity inevitably decreases.
The shelf parts are firmly welded in so that they cannot be subsequently installed or removed.
If necessary, the desired remaining number of long gun spaces will determine the width of the shelf section.

Pictured: a hanging shelf section with fixed shelves.
Accessories and other evaluation criteria:
Key bar:
Key racks are practical, but not an absolute must-have. Individual key hooks can also be retrofitted inexpensively as accessories.

In the picture: hook rail for keys.
Holder for cleaning rods:
Permanently installed cleaning rod holders are nice, but they also take up a lot of valuable space.
There are now magnetic cleaning rod holders (in our accessories section), a cleaning rod can also be stored outside the gun cabinet, which creates a lot of free space for storing other items that have to be kept IN the gun cabinet.

Pictured: Cleaning rod holder from GUNTRESS.
Other evaluation criteria:
Here we evaluate the test piece based on its overall visual impression and other obvious defects.

Pictured: SHOOTER young hunter with good paint job.
Now that you know our testing criteria, which we apply consistently to all test subjects, here are the test results:
Gun safe test: Gunshome, model Shooter
Gun safe test: Gunshome, model Hunter
Gun safe test: Format Tresorbau (Eisenbach safes), model Gun Safe / Capriolo
Gun safe test: ISS (Hartmann, Frankonia, Bremer, Waffenschrank...etc), model Luzern
Gun safe test: Burg Wächter (various hardware stores), model Ranger N5S